Penny Black

A Very Merry Christmas!

Good morning!

A quick post today as I have lots and lots to do today. This is no stamp Christmas card using old and new dies from Penny Black.

A Very Merry Christmas
 I love Penny Black Glorious die from last year’s release. I used it a lot on my Christmas cards last year especially in gold. For this card, I die cut the Glorious die using red glitter paper. I die cut a few of them so I can adhere them on a white panel randomly to make a background. Then I added a vellum panel. The sentiment is die cut using silver glitter paper. The sentiment die is called A Very Merry. I adhered the sentiment on a green stitched rectangle. I layered this on the vellum layer. Finally embellished using Pretty Pink Posh Classic Christmas and Silver sequins. Here is a closeup.
Here are the two Penny Black Dies: A Very Merry and Glorious, I have used to make my card.

a very merry picture 

Thanks for stopping by my blog today!
My blog signature
Winnie & Walter.

Black Friday Sales!

Good morning everyone!
Happy Thanksgiving to all my American friends. I don’t celebrate it but I love the sale part of it:) If you are like me and want to know of some sales, here are a couple of fantastic sales.
First up: Winnie & Walter is having 15% off all items. Code is BLACKFRIDAY2015. There is more! Here are the full details for you. Super Cool huh!
Second: Pretty Pink Posh is also having Black Friday Sales with three coupons. AWESOME!
Happy Thanksgiving and Happy Shopping everyone!
My blog signature
Altenew, Pretty Pink Posh

Simon Says Anything Goes!

Hi all and welcome to another week on the Simon Says Stamp Wednesday Challenge. Thank you for joining us for the Christmas Challenge and we hope you will all join us again this week too

wed-newchallenge-header
This week the challenge is Anything Goes!

We are showcasing Altenew Products this week. You don’t have to use them to join in but if you have some we would love to see them used.

As always Simon Says Stamp will be giving away $50 voucher to shop at the fabulous Simon Says Stamp Store
50dollar_voucher_600px
This is my card using Altenew products.

Thump card2//embedr.flickr.com/assets/client-code.js

//embedr.flickr.com/assets/client-code.js
I used Doctor’s Rule stamp set from Altenew to make my card. I love this set but have not used it since I bought it. It has been months sitting in my storage box. So I decided to tackle it for this challenge. I stamped the heart from the stamp set using Light to Dark Peach Hero Arts Ombre ink, then the heart shape is stamped over the heart image using Simon Says Stamp Teeny Bikini ink. I filled the space by stamping the sentiment in black to give contrast.

For the focal point, I black heat embossed the stethoscope  heart rate image on vellum panel, then added the sentiment stamp on strips of cardstock and adhered using foam adhesive. I also added the fuzzy cut stamped heart shape. Finished off with Gold 6mm and 4mm sequins from Pretty Pink Posh. Here is a closeup.//embedr.flickr.com/assets/client-code.js

Thump card closeup//embedr.flickr.com/assets/client-code.js

So now it’s YOUR turn, Happy Crafting

Instagram

If you use instagram add  #ssswchallenge to your challenge entry uploads so we can see them on there too!

You have until Wed  8am Ohio time. 1pm UK time, 2 pm CET to join in
No backlinking allowed, Only 5 new creations will be eligible in the prize draw

word-verif
Thanks for stopping by my blog today!
My blog signature
Taylored Expressions

Hello!

Good morning everyone,

Great to be back after a few hectic days. I have a CAS card share using Taylored Expressions Watercolor panels. The watercolor panels are trendy at the moment in cardmaking. They are basically doodle images printed on watercolor paper. These panels are 3 x 4 inches in size. Can be used either on the card or as project life cards. Here is my card using one of the panels from Keep in Touch Watercolor panels from Taylored Expresssions.

I simply coloured the panel using Zig Clean Brush watercolour pens. Then I added shimmer to the flower petals using Wink of Stella pen. I tossed between adhering the panel on plain white cardbase or on a pattern paper. Finally I chose the pattern paper with woodgrain pattern which is subtle on the background and still makes the watercolour panel pop right at you. I added some Sparkling Clear sequins from Pretty Pink Posh. Here is a closeup of the card.
There are two more watercolour panel sets from Taylored Expressions called Uplifting and Christmas for you to choose and watercolour. I love them all. Great alternative to colouring books and much more affordable.

Thanks for stopping by my blog today!

My blog signature
Christmas cards, Pretty Pink Posh

25 Days of Christmas Tag – Pretty Pink Posh

Hello everyone!

Tracey McNeely has been doing the 25 Days of Christmas Tags during the Christmas time for past five years. I have enjoyed participating in them for past three years. It is big source for holiday and Christmas tags for papercrafters. Lots of planning and efforts goes into it. Five years is a great milestone. Congratulations on your 5th Anniversary, Tracey!
Today I am participating  as design team member of Pretty Pink Posh. Here is Christmas tag using Pretty Pink Posh’s stamp set and dies.

I have used the Decorative Tag die to die cut two tags. One using vellum cardstock and the other with gold glitter cardstock. I punched a hole on top of the tags and set them aside. I then die cut the scalloped oval insert using gold glitter cardstock. For the focal point, I stamped, coloured and die cut the cup, cat and Christmas hat from Winter Friends stamp set and coordinating dies. I then glued the cat image over the cup and added the hat over the cat. I adhered the scalloped oval insert over the vellum using foam adhesives for dimension. The focal stamped image is also adhered inside the oval frame using foam adhesives. Then I stamped the sentiment from the same stamp set on a strip of white cardstock, trimmed fish tail banner and added to the bottom of the oval frame. Finally embellished with Sparkling Clear sequins.Then I layered the vellum decorative tag over the gold glitter tag tied them using gold twine and three jingle bells also from Pretty Pink Posh. I also brushed Wink of Stella shimmer on the hat which you can see in the photo below.

Tracey is also giving away plenty of prizes. Check out In My Creative Opinion Blog for more details.
Here are some fantastic sponsors.

Make sure you leave a comment to enter a chance to win a giveaway!

Thanks for stopping by my blog today!

My blog signature
MFT, Pretty Pink Posh

Simon Says Christmas

Hi all and welcome to another week on the Simon Says Stamp Wednesday Challenge. Thank you for joining us for the  Thinking of You Challenge and we hope you will all join us again this week too

wed-newchallenge-header

This week the challenge is  a Christmas challenge!

We are showcasing My Favorite Things Products this week. You don’t have to use them to join in but if you have some we would love to see them used

As always Simon Says Stamp will be giving away $50 voucher to shop at the fabulous Simon Says Stamp Store.
50dollar_voucher_600px

I have two cards for your today. For both the cards, I have used Pure Innocence:  Merry Christmas Banner stamp set and coordinating die. On my first I heat embossed the cute image in black and watercoloured in traditional colours.

I used Zig watercolour pens to colour my image and then die cut the image using the coordinating die. For the background, I used MFT’s Sunray stencil  and sponged Spiced Marmalade and Ripe Persimmon distress inks. I did not sponge the inks all the way to the end but faded it off towards the end. I then adhered the image using foam adhesives. Embellished with Sparkly Clear and Sunshine Glow iridescent sequins from Pretty Pink Posh. Here is a closeup of the cute girl holding the Christmas banner.

For the second cards, I white heat embossed the same girl’s image and watercoloured her using non traditional colours. 


Merry Christmas mft card 1//embedr.flickr.com/assets/client-code.js

For the background, I smooshed Salty Ocean and  Peacock Feather distress inks. I love the unpredictable hard and soft edges of the watercolour on the background. Once dry, I adhered the girl image die cut on the background using foam adhesive. Embellished with Sparkly Clear sequins from Pretty Pink Posh. Here is closeup of the card. 

 I love both by the first card is my favourite. I like the black embossing and the colours of the girl’s dress more than the white embossing. Which one is your favourite?

 So now it’s YOUR turn, Happy Crafting

Instagram

If you use instagram add  #ssswchallenge to your challenge entry uploads so we can see them on there too!

You have until Wed  8am Ohio time. 1pm UK time, 2 pm CET to join in
No backlinking allowed, Only 5 new creations will be eligible in the prize draw

word-verif
Card Supplies:

http://static.inlinkz.com/ppr.js

Thanks for stopping by my blog today!
My blog signature
Uncategorized

Hero Arts Holiday Blog Hop

Hello and welcome to Hero Arts Holiday Blog Hop with A Blog Named Hero.
Today we are showcasing Holiday cards using Hero Arts Holiday products. You should have come from Chitra Menon’s Blog. If this is your first stop in the hop, thats okay, I have the full list of designers participating in the blog hop towards the end of the hop. 
I have two cards for you today. My first card is a kind of one layer CAS card.
Season's Greetings
I used Lia Griffith’s Deck the Halls stamp set and Holiday Petals and Leaves stamp set to make this card. I trimmed a a white card to 4 x 5.25 inches. I masked the sides and top and bottom using masking tape. I then sponged Salty Ocean, Mermaid Lagoon, Seedless Preserve, Dusty Concord and Chipped Sapphire distress inks. I sponged the colours back and forth until I got a smooth blend. I then spattered some clean water, mopped it then sprayed shimmer mist. Once dry, I stamped the reindeers from Lia’s set on the bottom and the sentiment from Holiday Petals and Leaves on the top using Versafine Onyx Black ink. I then removed the mask and mounted this panel on a white card base. Then embellished with Sparkly Clear sequins from Pretty Pink Posh. Here is a closeup

season's greetings closeup1//embedr.flickr.com/assets/client-code.js

Card Supplies:

http://static.inlinkz.com/ppr.js
//embedr.flickr.com/assets/client-code.js

For my second card, I have used the Holiday Petals and Leaves stamp set.

Merry Christmas card2//embedr.flickr.com/assets/client-code.js

I love Jennifer’s monochromatic layering technique. I stamped the images from the stamp set on a green card panel using green ink. Since this set does not have layering images, I used white gel pen to add my highlights. Then I stamped the sentiment from the stamp set in black on two strips of white cardstock. I also stamped the bow from the stamp set using red ink and cut it out. I adhered these on a vellum panel using foam adhesive. I then used foam behind the sentiment to adhere the vellum panel on the card panel. Finally embellished with Classic Christmas sequins from Pretty Pink Posh. This card panel is then adhered on a white cardstock. Here is a closeup.

Merry Christmas closeup//embedr.flickr.com/assets/client-code.js

I love the tone on tone background on this card.

Card Supplies:

http://static.inlinkz.com/ppr.js 

Both the cards are simple and easy to mass produce. You can add gold twine to both of them if you like to take it to next level. Hope you like my cards.

Your next stop is to Isabel Rivera’s Blog. Here is the list of all the designers participating in the blog hop.
Make sure you leave comment on all the blogs in the hop. There are three Hero Arts kits to giveaway. Winners will be randomly choosen from any of the blogs. The comments need to be received by 11.59PM PST on Sunday November 22nd. The winner will be announced on Tuesday November 24th on Hero Arts Blog.
Thanks for stopping by my blog today! Happy Hopping!
My blog signature
A Blog Named Hero, Hero Arts

I am over at A Blog Named Hero today!

 Good morning everyone!
At A Blog Named Hero, we are celebrating Hero Arts this month. I have a solo post at the blog today with a Christmas card using Santa’s Elves Stamp & Cut. Here is a sneak peek!
Head over to A Blog Named Hero Blog for more details on how I made the card. And there are plenty to giveaway this month. So make sure your enter the Rafflecopter for a chance to win 🙂
Thanks fro stopping by my blog today!
My blog signature
Penny Black

Life is a Miracle – A Penny Black card!

Hello everyone,
I have a very colourful card to share today! I made this card using Penny Black stamp sets and dies.
I started with a white cardstock trimmed to 4 x 5.25 inches. I randomly trimmed a masking paper to mask off  the bottom of the card panel. Then I sponged Picked Raspberry, Abandoned Coral, Seedless Preserve and Dusty Concord Distress Inks. Went back and forth until I got the blending right. Then I masking the sponged side and sponged Crushed Olive and Mowed Lawn distress inks. Again going back and forth until the colours blend evenly. Then I spattered with some clean water. Once dry, I stamped the leaves from You & Me stamp set in black. I use Versafine Black pigment ink. This ink gives a clean and detailed finish. Then I glued the Wonder & Joy die cut in gold glitter cardstock. Stamped the sentiment from Season’s Gift stamp set in black. I adhered this panel on to a gold cardstock and embellished with Pretty Pink Posh Gold 6mm and 4mm sequins.

Life Miracles card flat//embedr.flickr.com/assets/client-code.js

Here are the Penny Black stamp sets and dies I have used to make my card: Wonder & Joy die, Season’s Gift stamp set and You & Me stamp set.

wonder & joy picture
Thanks for stopping by today!

My blog signature

Uncategorized

Pretty Pink Posh November Product Blog Hop!

Hello! Welcome to Pretty Pink Posh November release blog hop!

I am excited and been waiting for this day to share with you Pretty Pink Posh’s new stamp set and dies. Yes, Paulina is releasing stamp set and coordinating dies. Yay! Very exciting and a huge congratulations to Paulina for her new adventure.

For this hop, you should have arrived from Shannon McComb‘s blog. If this your first hop, then don’t worry, I will list the participants of this hop towards the end of the post. Make sure you visit all the blogs and comment. There are two giveaways. The details of that is also at the end of the post.

I have a few cards to share. So make yourself a cuppa and enjoy!

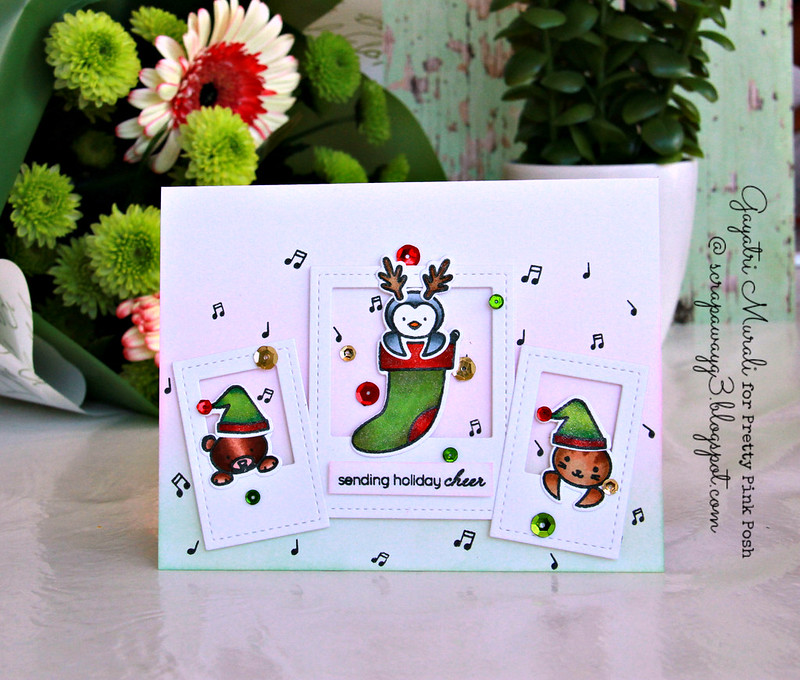
First up are two cards using Winter Friends Stamp Set, Winter Friends coordinating dies and Photo Frames die set.


Sending holiday cheer card//embedr.flickr.com/assets/client-code.js

I love the Photo Frames die set. They are perfect size to go on the card front either as a cluster or just one. I decided to cluster in three. I choose the large Photo Frame and the two smallest ones. The cute images of dog, cat and penguin from Winter Friends stamp set is designed to peek out of the other elements in the stamp set such as the stockings and coffee. I decided to use the photo frames instead. I stamped, copic coloured, die cut and brush the images with Wink of Stella.  On a white card base, I sponged Spun Sugar and Cracked Pistachio distress inks. Then randomly stamped the music notes from the stamp set in black ink. I then adhered the photo frames die cut using foam adhesives overlapping the smaller frames slightly over the large one. Then I adhered the coloured die cut images from the Winter Friends stamp set again using foam adhesives. Stamped the sentiment from the same stamp set on a strip of cardstock sponged with Spun Sugar distress ink. Finally embellished with Classic Christmas sequins mix. Here is a closeup.

Sending holiday cheer//embedr.flickr.com/assets/client-code.js

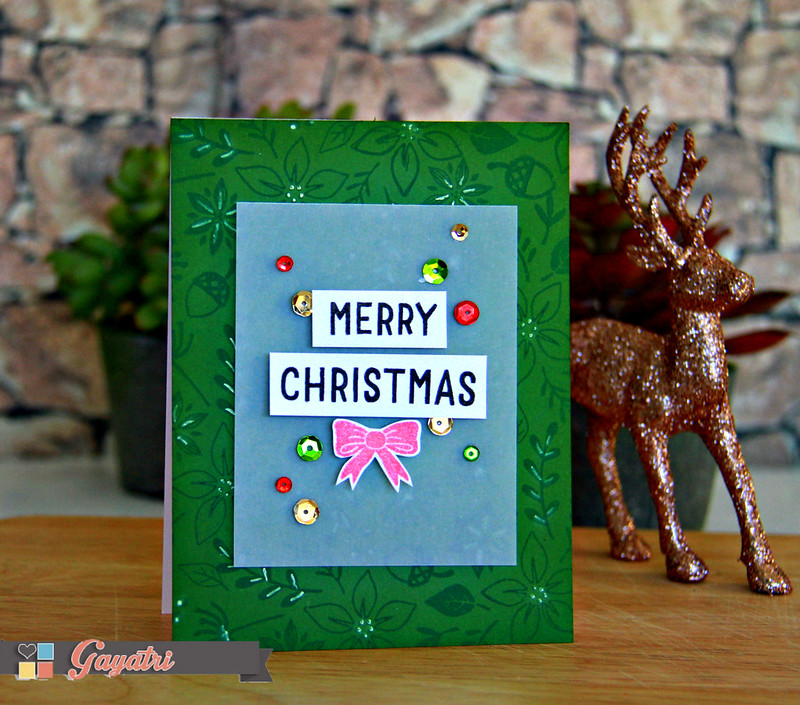
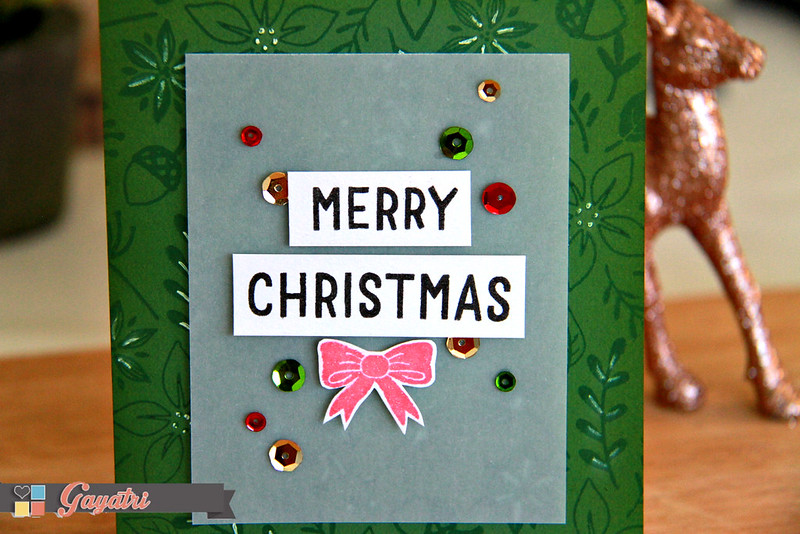
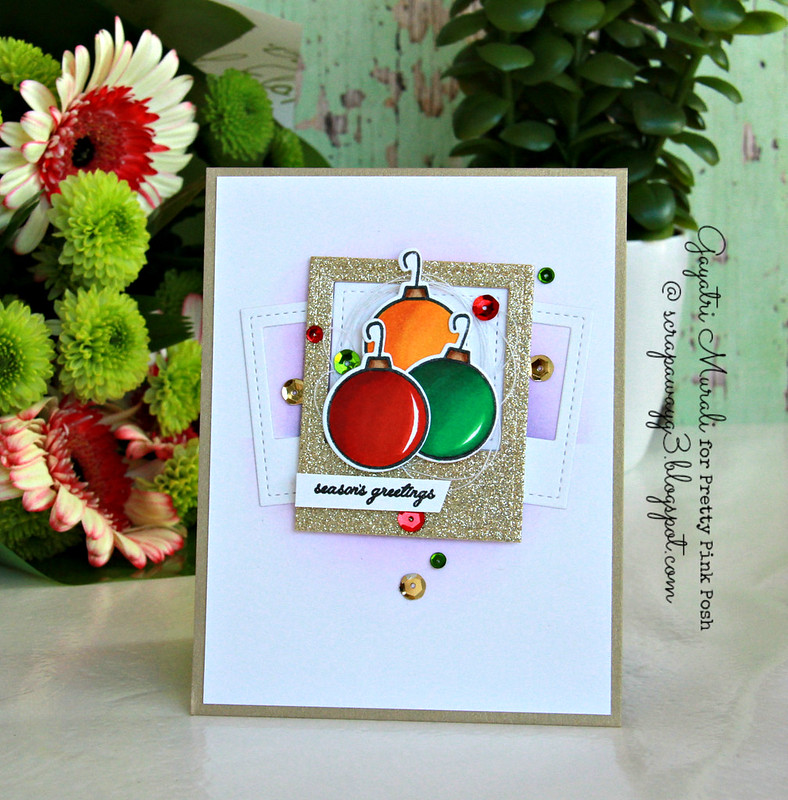
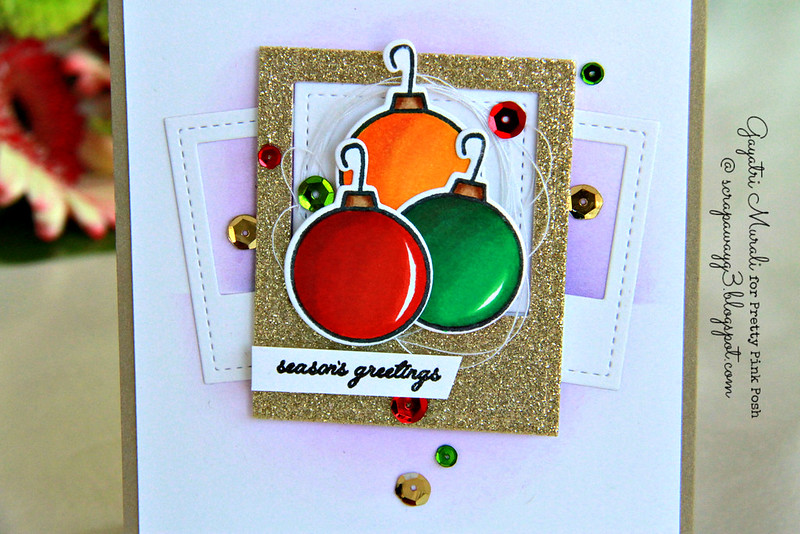
On my second card, I use the baubles from the Winter Friends stamp set and photo frames dies.

Season's Greetings card1//embedr.flickr.com/assets/client-code.js

//embedr.flickr.com/assets/client-code.js
For this card, I stamped copic coloured and die cut the baubles from Winter Friends Stamp Set. Then I die cut the large photo frame with gold glitter cardstock, the smaller photo frames using white cardstock.  On a white card panel, I sponged some Seedless Preserve and Mermaid Lagoon distress inks to the centre of the panel. Then layered and glued the large photo frame over the two white photo frames. Added the inside of the large photo frame in white, then layered glued the baubles with bunched up thread under it. I stamped the greetings on a strip of white cardstock, trimmed an angled edge and adhered using foam. Embellished with Classic Christmas sequins from Pretty Pink Posh. The card base is brushed gold cardstock. Here is a closeup.

Season's Greetings closeup//embedr.flickr.com/assets/client-code.js

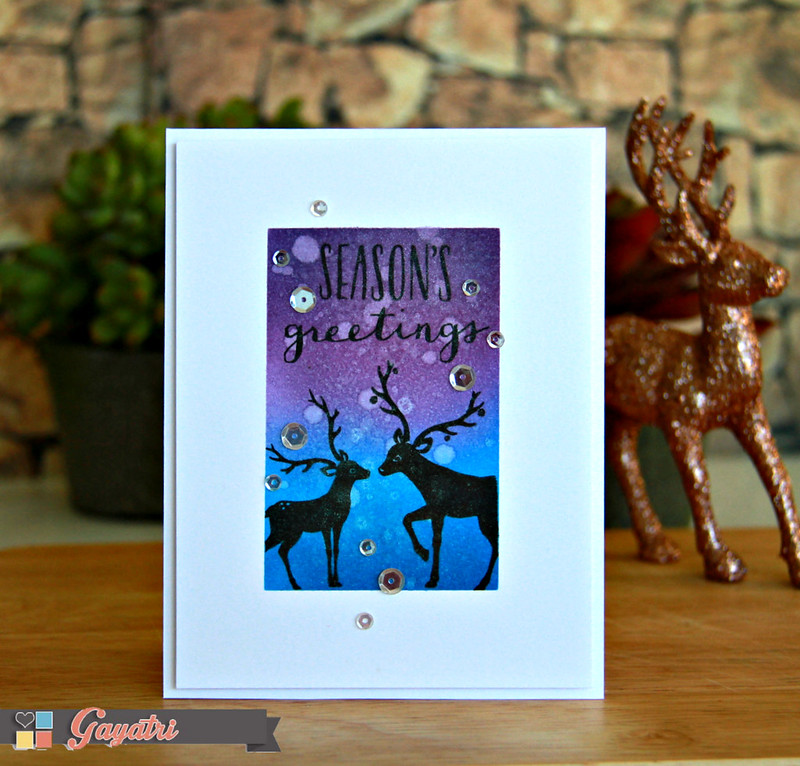
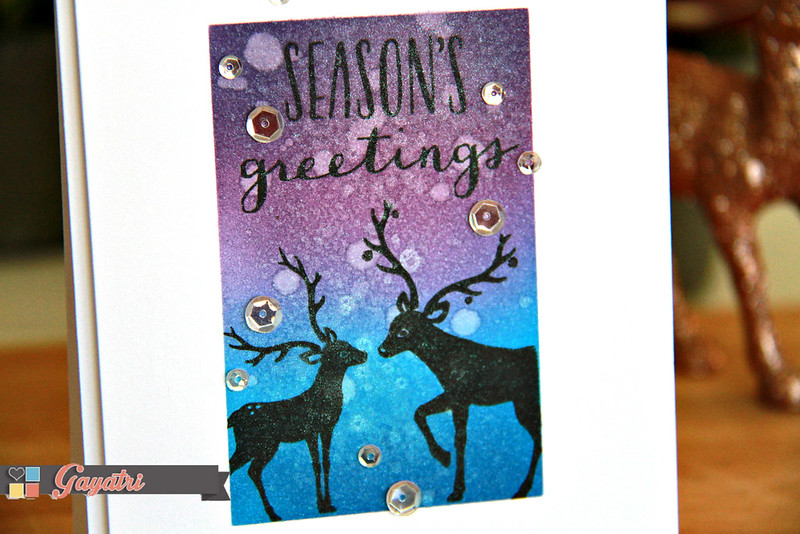
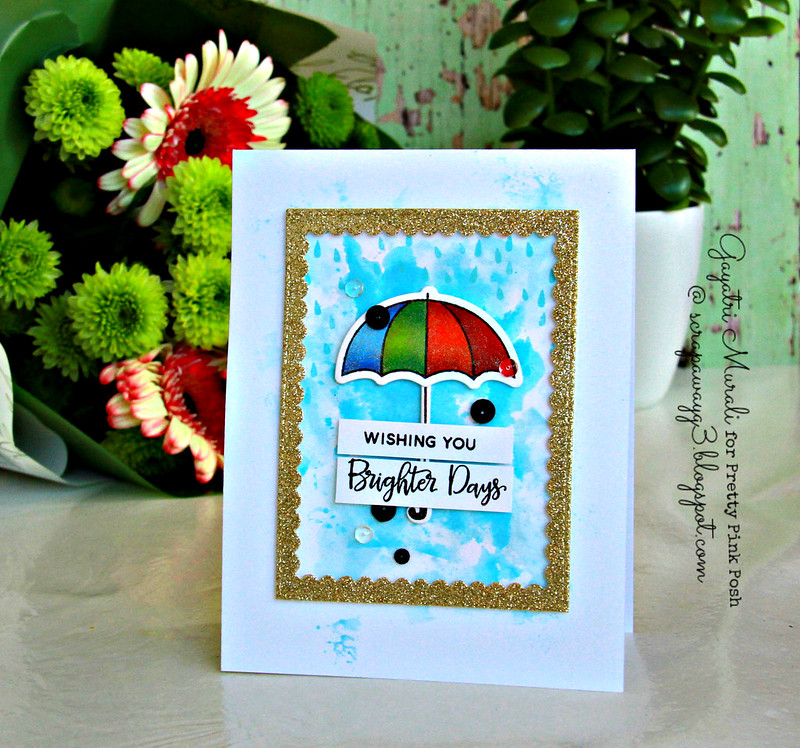
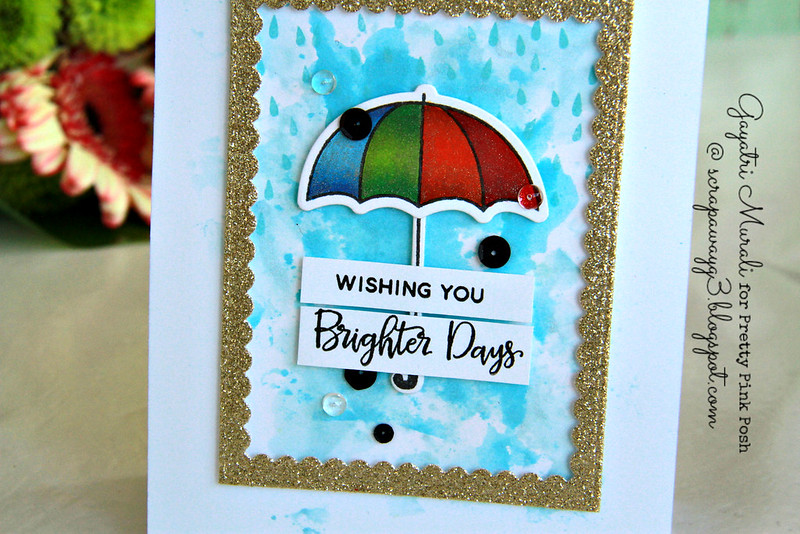
Next card features Pretty Pink Posh Exclusive Scallop Frame Dies, Rainy Days stamp set and Rainy Days Coordinating dies


Brighter Days card 2//embedr.flickr.com/assets/client-code.js

I did some ink smooshing technique to make my background for this card. I wanted a watercolour wash look to the background. I used acetate sheet to smoosh Salty Ocean distress ink on my card front. This is not watercolour cardstock but Neenah Solar white. I added layers of ink by drying the ink layer in between. Then I flattened the cardfront by putting the card base between few cardstock packs. Then I set out to stamp, copic colour and die cut the umbrella and the handle. Die cut the smaller scallop die using glitter gold cardstock, stamped the sentiment on white strip of cardstock.

Then I went back to my card base which is now dry and flat. I stamped some raindrop using blue pigment ink. Since pigment ink sits on top of the cardstock, they add a tiny bit of dimension making the rain drops dimensional. I adhered the scallop frame using foam adhesives, similarly the umbrella in the middle, then the sentiments strips on the handle of the umbrella. I finally embellished the card with Clear Droplets and Onyx 4mm and 6mm sequins. Here is a closeup.

Brighter Days closeup//embedr.flickr.com/assets/client-code.js

Hope you like my cards using the new release stamp sets and dies from Pretty Pink Posh. You next stop in the hop is to Lexa Levana‘s blog.

Here is the list of all the designers participating in the blog hop today.

//embedr.flickr.com/assets/client-code.js

This is day #1 of the hop. There is one more blog hop tomorrow with a different set of designers. Make sure you hop and leave comments on all the blog. There are four $25 gift certificates up for grabs (two for each day!) Winner will be picked randomly along the blog hop. Comments to be left by 11:59PM PST on 11/16/2015. Winners will be announced on Pretty Pink Posh Blog on November 18th.

Card Supplies:


http://static.inlinkz.com/ppr.js

Thank for stopping by today.

My blog signature